 Windows Ten’s “Trusted Mail App” ~ Can ~ do POP e-Mail
It works. That’s all we can say. It is difficult to set up and it is slow once it is set up. It “can” do it, so here’s how you “can” make it do it.
We only tested from a “clean” install of Windows Ten (10, X). The first time run of mail starts a “First Time” or “Out Of Box” experience that you will only ever see the real “first time.” If you add an account and then delete it, Mail App then loads with an “empty” workspace and everything has to be done manually. Throughout this post we use “click” to mean tap or click.
Here are the steps we followed – screenshots follow in order:
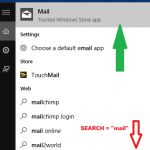
- Click inside the “Search Area / Address Bar” (next to the “Start/Windows Logo”) and type “mail”. Click “Mail – Trusted Windows Store app” at the top of the menu/search results.
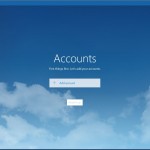
- Click on “+ Add account” on the “First Time/Let’s Get Started” screen
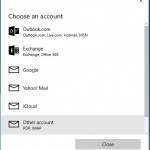
- Click on “Other account – POP, IMAP”
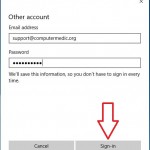
- Put in your full email address and password. Click the “Sign-in” button.
Note: make sure your password is correct, it is very important to not causing syncing errors and extremely long delays when finished. - The first time – after a pretty long delay – you will get a message that says: We couldn’t find info for that account. Make sure the email address is correct and try again. Click the “Sign-in” button two-to-three more times until “Sign-in” changes to “Advanced”. (5th image)
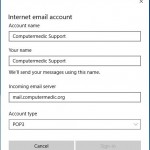
- Click “Advanced” to get to the scrolling “Internet email account” screen.
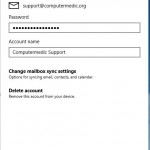
- Give your account a name (this is what it be called “locally”).
- Enter “Your name” (this is what you want to appear when people receive email from you).
- “Incoming email server” should be your domain name (everything after the @ in your email address) or mail.yourdomainname.ext[ention] (the mail. is optional)
- Change the “Account type” from IMAP to POP3
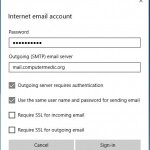
- Scroll down until you see “Username” and “Password” (those should be there) and “Outgoing (SMTP) email server”. Your outgoing server is the same as your incoming server. You can use the domain name only (everything after the @ in your email address) or the optional mail. prefix plus your domain name.
- Scroll down to the bottom and take the check-marks out of the “Require SSL” (incoming and outgoing) boxes. Leave the top two check-marks in place. See: Picture 8.
- Click on “Sign-in” and you will be returned to the “First things first…” screen.
- Click on “Ready to go” (picture 9) and…
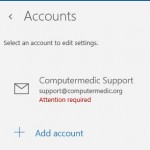
- Your first “big problem and delay” appears. It took almost 20 minutes for our test computer to “time out” and give us the “Your account settings are out of date” alert/notification. There is nothing you can do but wait it out. Once the alert appears with the [Fix Account] and [Dismiss] buttons, click on Fix Account. (Picture 10)
- Fixing the account consists of clicking the “Continue” button on the “Untrusted certificate” screen. (Picture 11) If you click cancel nothing will work and you’ll have to figure out how to delete the account and start over without the “First things first” screen.
- Finally, here is the importance of that password (back at step 4). We – on purpose – entered it incorrectly to “see what happens.” BOOM! That’s what happens. Another 20+ minutes for the timeout on the incoming server, then again (total 40+ minutes) for the outgoing server’s timeout. In the meantime we got “blocked” from the mail server for “Too many failed AUTH attempts”. During that 20 minutes of “Still working on it…” the “Mail app” was trying to log in hundreds of times per second with the wrong password. After just over 40 minutes we got another Alert/Notification that “Your account settings are out of date”. Fix this time was entering the correct password. Once done, the “Inbox” sync-ed almost instantly, then 20 more minutes and the same “block” from the server because “Mail app” did not “fix” incoming and outgoing servers the first time. Alert again, fix again (this time we dismissed it and manually fixed it by clicking the “gear” icon and going to the Account Settings). Somewhere around one hour and forty-five minutes later, mail sent and received.
Of other note: The “Mail app” does not appear to delete the mail from the server. This is good – and – bad. It’s good if you have multiple devices checking the same account. It’s bad if you delete mail from the server from your other devices. The “re-sync-ing” of mail that is the Inbox of “Mail app” and no longer at the server is a very, very, very long and slow process. We only had one message, removed it from the server via webmail, it took “Mail app” 7 minutes to “sync” (remove the one message from Inbox and do whatever background database or file “magic” it does during “Still working on it…”).
So, there it is, the pictures are next, and here is one more recommendation/reminder from us: You can use the “Mail app” in Windows Ten (10, X) for your ComputerMedic.org hosted email (POP3/SMTP) – it is a lot easier to use a 3rd party app (or program) like Mozilla’s Thunderbird. ( https://www.mozilla.org/en-US/thunderbird/ )
-
- 1
-
- 2
-
- 3
-
- 4
-

- 5
-
- 6
-

- 7
-
- 8
-

- 9
-

- 10
-

- 11
-
- 12
-
- 13
-
- 14